The Site editor allows you to design the entire site including the header, footer, and everything in between, with blocks. It gives you greater control over how your site looks.
The Site Editor is only available when you install and activate a Block theme on your site.
How to access the Site editor
To work with the Site editor, you need to use a block theme on your site. A block theme is a theme that uses blocks for all parts of a site, including navigation menus, header, content, and site footer.
All blocks that are available in the WordPress Block editor can be used in the Site editor. A set of blocks called Theme blocks are specifically built for the Site editor.
To find block themes, from the WordPress dashboard, go to Appearance > Themes and click Add New. In the Add Themes page, select Block Themes to find the growing list of Block themes in the WordPress theme directory.
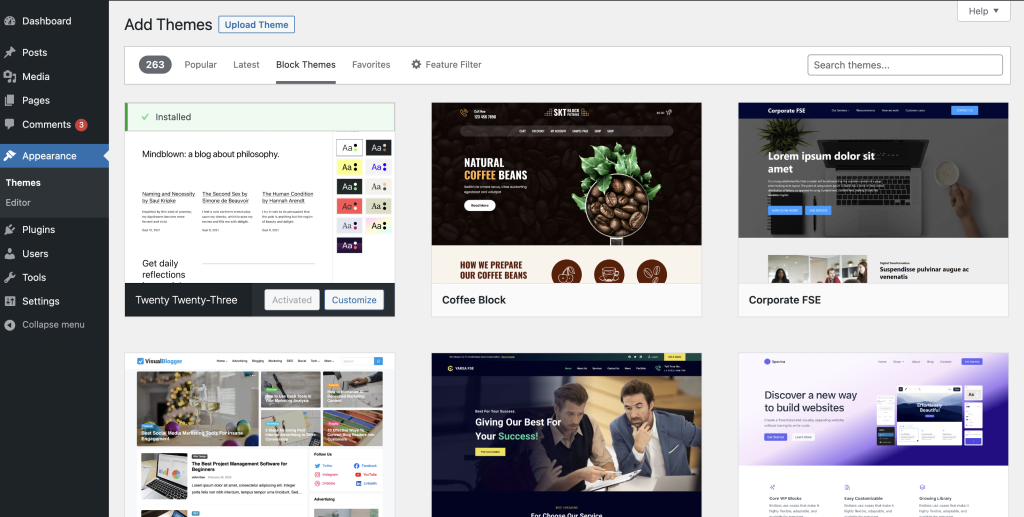
Once you install and activate a Block theme on your site, go to Appearance > Editor to open the Site Editor.

Things to do in the Site Editor
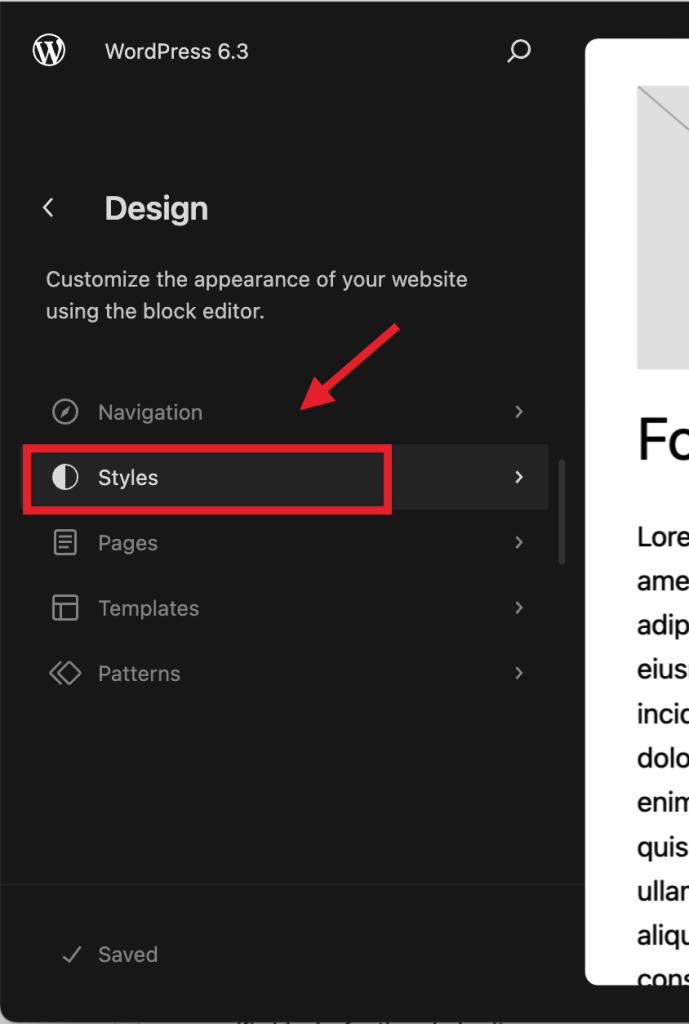
Once you enter the Site Editor, you will see five menu items.
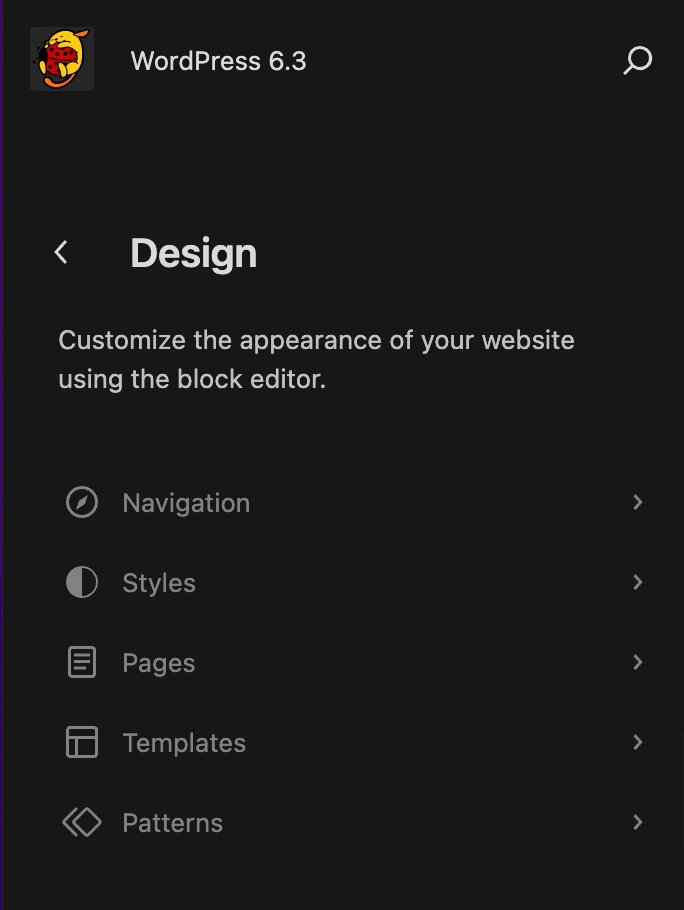
- Navigation: Allows you to browse your menus and make basic changes.
- Styles: Provides a direct access to edit your site’s style variations.
- Pages: You can now edit the content of your pages inside the Site Editor itself.
- Templates: Review the different default layouts for the different sections on your site, as well as custom pages (search results, 404, etc).
- Patterns: Your Synced patterns and template parts can be managed here.
You will also see an icon of a magnifying glass. Click on it to access the Command Palette.
Below is an overview of the different sections in the Site Editor.
The Site Editor workspace
The Site editor loads the home page of your site (based on what you have set in the Reading Settings) to start editing.
The top menu in the Site editor includes the following options:

- The site icon (or the W icon, if no site icon is set for the site): Return to the dashboard or switch to the other section of the Site Editor: Navigation, Styles, Pages, Templates, or Patterns. If you choose to return to the dashboard, it will prompt you to save the changes or leave the Site editor without saving the changes.
- The + Block inserter button: Add a new block, block pattern, Media, or synced pattern (if the site has synched patterns) to the Site editor.
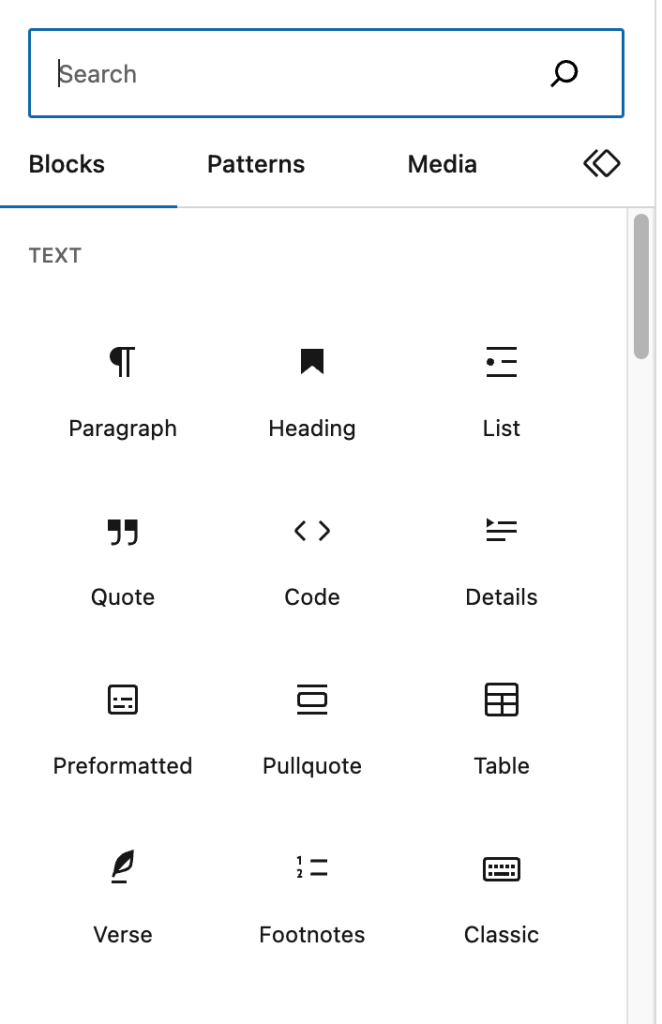
- Tools: Switch between editing a block and selecting a block. Choose the Select tool (or press the
Escapekey on your keyboard) to select individual blocks. Once a block is selected, press theEnterkey on your keyboard to return to editing.

- Undo: Undo the most recent action taken.
- Redo: Redo an action you reversed using the Undo button.
- List View: See a list of all of the blocks that are on the page and easily navigate between the blocks on your page. This is useful for seeing the page’s structure and editing, moving, and removing blocks.
- Command Palette: Click here to access all your site’s content, templates, and patterns quickly, as well as invoking other actions (settings, new page, etc).
- Save: Save the changes you made in the Site editor.
- When you click the Save button, you will get a list of all the synced patterns, navigation menus, templates and template parts where you have made changes.
- You can choose to save all or just some of them.
- Note that some changes (like changes to the Header and Footer templates) will apply to all pages of your site that use those templates, and not just the page you were working on.
- Settings: Show or hide the Template and Block Settings sidebar menu.
- Styles: Browse style variations available for the theme you have, set the typography, color palettes, and layout for the entire site, or customize the appearance of specific blocks for the whole site.
- More Options: Click the three vertical dots icon to open additional settings and tools.

View top toolbar: Display or hide the top toolbar in the editor. When you enable this option, block toolbars are pinned to the top of the WordPress block editor (right under the top toolbar) instead of appearing directly above the block.

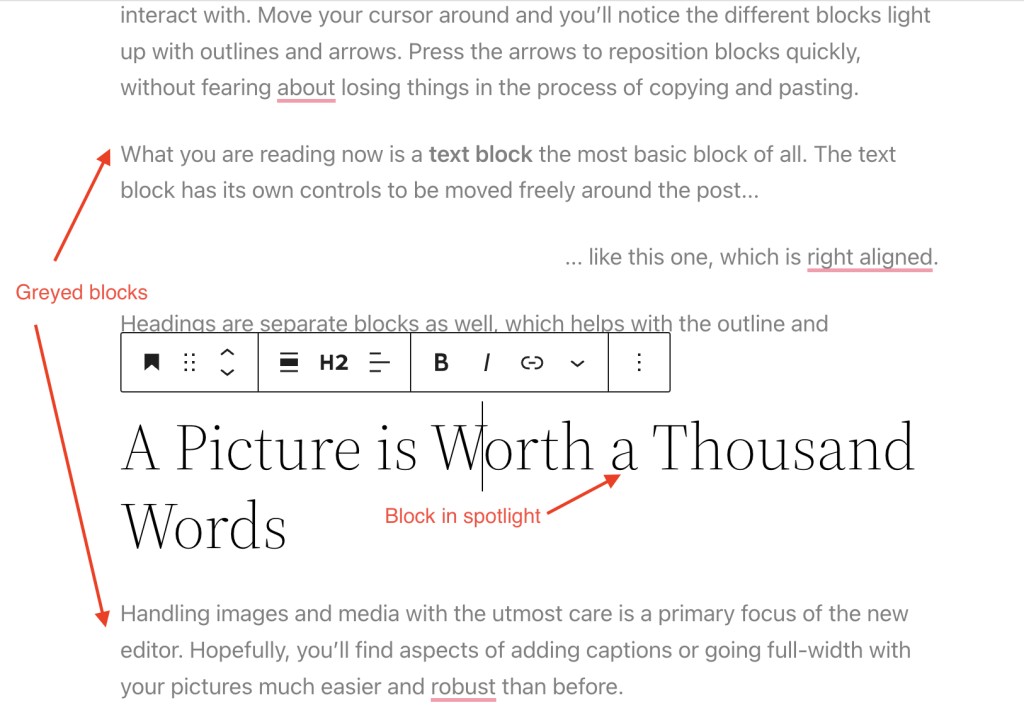
Spotlight mode: All blocks are greyed out except for the one you’re working on so that you can focus on a single block at a time.
Distraction Free: When this options is activated, all non-essential parts of the UI will be hidden to provide a more immersive editing experience.
Editor: By default, you will be in the Visual editor. Switch to the Code editor to view the entire page in HTML code editor.
Plugins: Here, you can switch between Settings and Styles in the Site editor Sidebar.
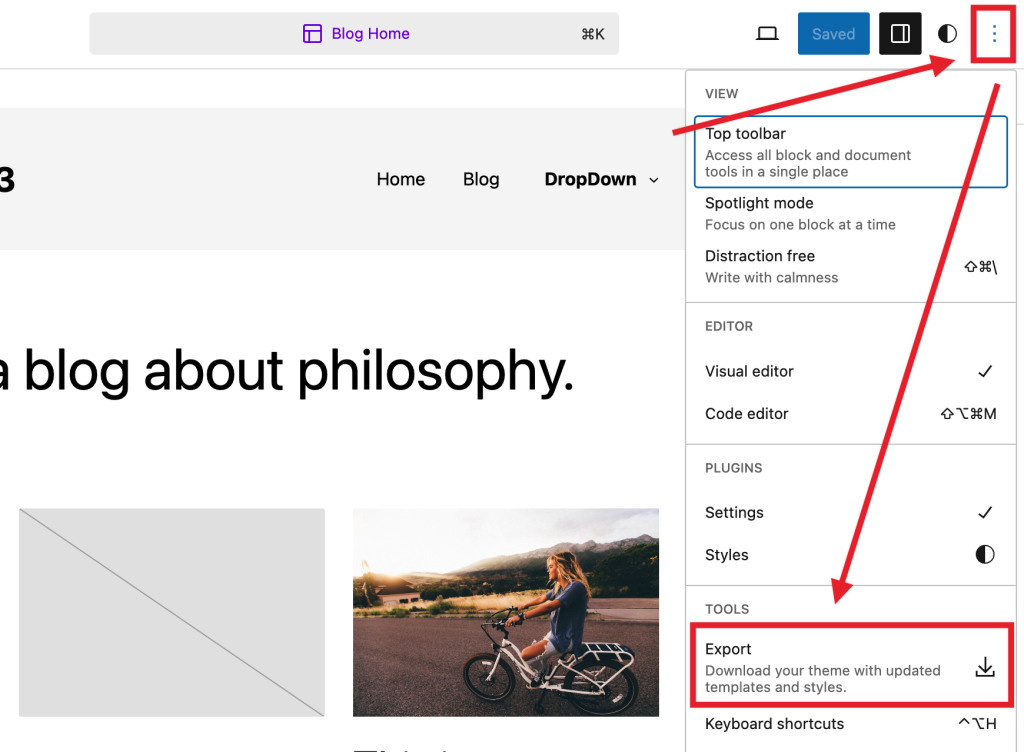
Tools: Here, you can download your theme with the updated templates and styles (Export), learn keyboard shortcuts, visit the Site Editor welcome guide, copy all blocks, or view additional support articles.
Preferences: Use the Preferences menu to customize the editing experience and change how you interact with blocks.
How to use the Site Editor
To edit the site’s styles
You can use the Site Editor to customize the styles for the entire website and for the blocks. Styles settings are available regardless of what template or template part you are editing.
- Go to Appearance > Editor.
- Click the Styles menu item or on the icon next to the block settings sidebar.
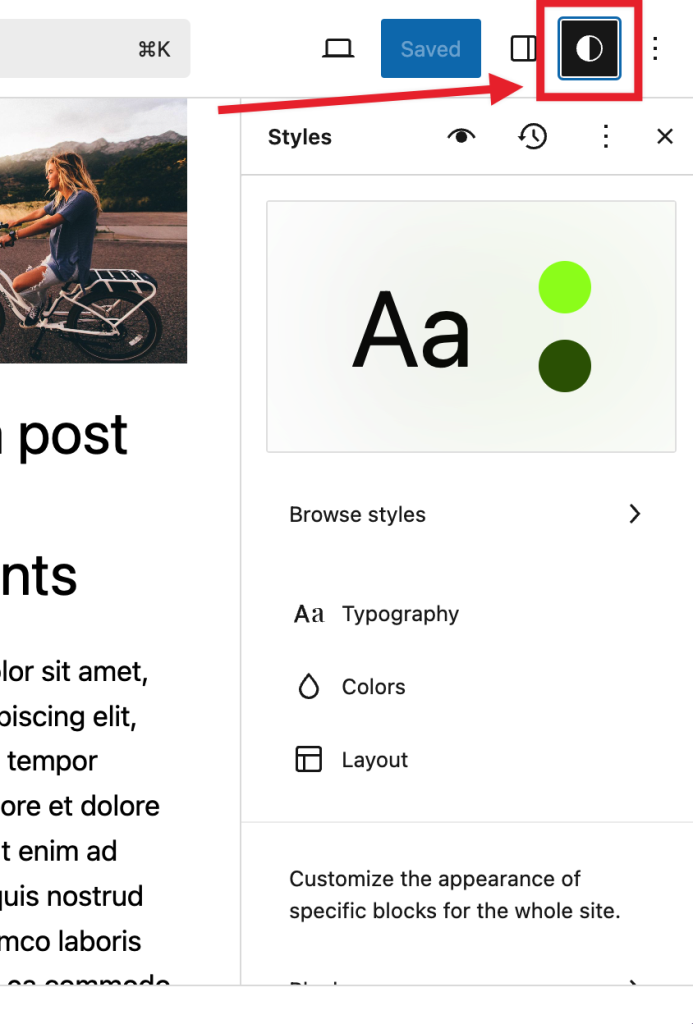
In the Styles section, you can browse the style variations available for the theme you have, change the color palettes and typography, and layout across the entire site and also change the appearance of blocks which are also applicable across the whole site.
To review your style revisions or reset the changes you made completely, click the three-dot menu icon in the right corner and select either option.
Learn more about Styles in this support article: Styles overview.
To customize the site’s layout
You can use the Site Editor to build the structure and layout of your entire site, using blocks. Eg: areas like headers, footers, and the structural appearance of your site’s posts and pages.
All blocks that are available in the WordPress Block Editor can be used in the Site Editor. A set of blocks called Theme blocks are specifically built for the Site Editor.
Examples: the Query Loop Block allows you to customize the look and feel of your post layout, the Navigation Block lets you customize the site’s navigation menu, the Site Title Block helps to customize the Site Title and more.
Check out the full list of Theme blocks.
Example – How to Customize Twenty Twenty-Three using the Site Editor
Twenty Twenty-Three supports the Site Editor and can be customized using it. As an example, let’s remove the gap at the top of the home page in Twenty Twenty-Three. To do this, remove the padding at the bottom of the header template part and the padding at the top of the content area.


First, remove bottom padding of Header Template Parts.
- From Administration Screen, Select Appearance > Editor
- Select Patterns > Template Parts > Header > Header, and click Pencil icon to edit it.
- Select the Group > Row block. Use the bottom block navigation.
- From Block Settings, Click Styles.

- Scroll down to the Padding > Bottom. Current value is 2.
- Set it to 0.
- Save the template parts.
Next, remove top padding of content area.
- Back to the Site Editor.
- Select Templates > Home, and click Pencil icon to edit it.
- Select the top Group block. Use the bottom block navigation.
- From Block Settings, Click Styles.

- Scroll down to the Padding > Top. Current value is 3.
- Set it to 0.
- Save the template.
To browse the templates and template parts
From the Site editor, you can easily browse the templates and templates parts available for your site.
- Go to Appearance > Editor to open the Site editor. This will bring you to a view where you can choose to browse your templates or template parts.
- Click on Templates to preview the list of templates available for your site.
- Click on Patterns to preview the list of template parts.
To manage the site’s templates
WordPress uses templates to create the layout and structure for specific page types on your site. The Site Editor displays the template choices that you can add to your site and lets you create custom templates using the Template Editor.
From the Appearance > Editor, you will be shown a view that includes a sidebar with your list of Templates and Patterns that includes the list of template parts.
Learn more about Templates in this support article: Template Editor.
To manage the template parts
A Template part is a block for managing the repeating global areas of the site such as a Header, Footer, Sidebar, etc. They are primarily meant to define the site structure and can be reused. You can also create custom Template Parts that can be reused through the templates.
From the Appearance > Editor, click the Patterns option. From All templates parts, you can access to them.
Learn more about Template Parts in this support article: Template Part.
To manage pages
Since version 6.3, it is possible to manage, edit and create pages via the Site Editor, under the “Pages” section.
Learn more about managing pages via the Site Editor in this support article: Site Editor Pages
How to return to the Dashboard
To go back to your dashboard, click the WordPress icon (or Site icon if you have set one) to open the Site Editor left navigation. Select < to take you back to your WordPress dashboard. You will be prompted to save the changes you have made in the Site Editor before leaving.

How to export templates and styles
テンプレート、テンプレートパーツ、スタイル設定など、サイトエディターで加えた変更を含め、ツール > エクスポートのオプションと同様に、テーマをエクスポートできます。
- 外観 > エディターに移動してサイトエディターを開きます。
- スタイル設定オプションの横にある縦に並んだ 3 つのドットアイコンを選択します。
- ツールで、エクスポートを選択します。これによりエクスポート処理が開始され、テンプレートとテンプレートパーツを含むテーマの zip ファイルがダウンロードされます。
サイトエディターを使用する際に便利なツール
サイトエディターを使用する際には、次のツールが役立ちます。
コマンドパレット
コマンドパレットを使うと、サイトのコンテンツ内をすばやく移動したり、新しい投稿やページの作成、環境設定の切り替え、スタイルやカスタム CSS 設定へのアクセスなど、さまざまなアクションを実行したりできます。
サイドバーのサイト表示で検索アイコンをクリックすると、コマンドパレットを開くことができます。編集表示では、コマンドパレットは上部のタイトルバーにあります。Mac では キーボードショートカット Cmd+k、Windows では Ctrl+k も使用できます。
コマンドパレットについて詳しくは、以下のサポート記事をご覧ください: サイトエディターのコマンドパレット。
リスト表示
リスト表示を使うと、複雑なブロックレイアウトや入れ子になったブロック構造を移動できます。必要なブロックを正確に選択でき、作業中のページのブロックレイアウトの概要もすぐに確認できます。複数のブロックを簡単に選択して、編集、移動、グループ化できます。
リスト表示について詳しくは、以下のサポート記事をご覧ください: リスト表示。
ブロックパターン
ブロックパターンは、投稿やページに挿入できる定義済みブロックのコレクションです。挿入後にさらにカスタマイズできます。WordPress には標準のブロックパターンが用意されています。ブロックテーマに含まれているブロックパターンもあります。
ブロックパターンについて詳しくは、以下のサポート記事をご覧ください: ブロックパターン。
スタイルのコピーと貼り付け
WordPress 6.2 では、ブロックスタイルをコピーして貼り付けられる新しいオプションが追加され、作成したデザインを簡単に再利用できるようになりました。このオプションは、任意のブロックの 3 点ドットメニューから利用できます。’同じ種類のブロック間でコピーして貼り付けるために使用することを想定しています。
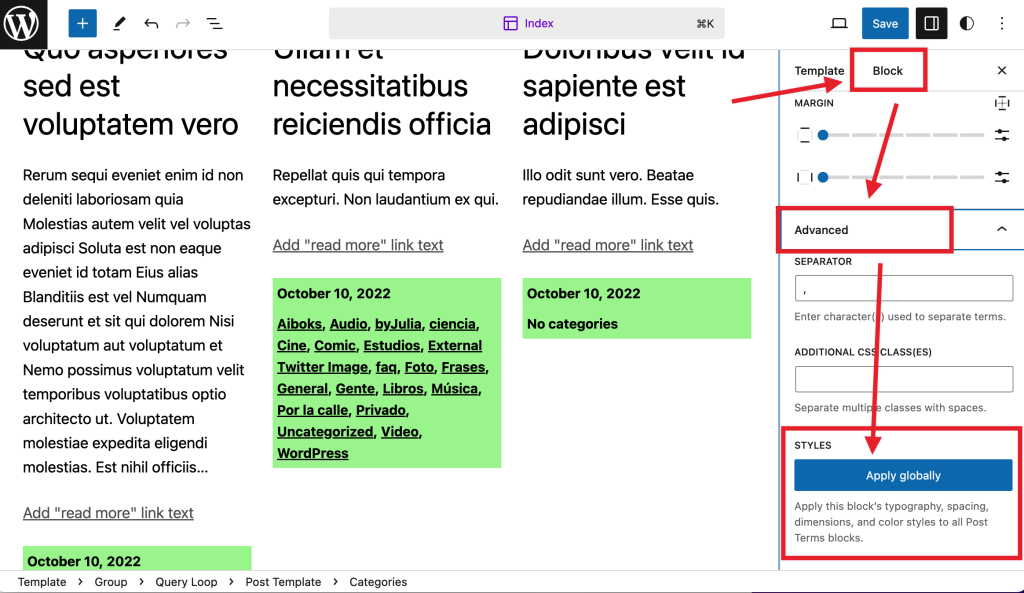
スタイルの変更をグローバルに適用する
デザインの作成や個々のブロックのカスタマイズで、より高度なオプションを使うことに慣れている場合は、WordPress 6.2 以降、個々のブロックに加えた変更を同じ種類のすべてのブロックに適用できます。たとえば、ブロック設定の高度な設定セクションにある新しいオプションを使って、個々のブロックに適用したデザインをサイト内のすべてのブロックに適用できます。
サイトエディターのプレビューをサイズ変更する
サイトエディターを使用しているとき、表示中のテンプレートやテンプレートパーツのプレビューを変更したい場合があります。濃いグレーのサイドバーのハンドルを選択し、好みに合わせて動かすことで変更できます。
リソースリンク
変更履歴
- 更新日 2024-09-14
- テンプレートおよびテンプレートパーツの管理セクションをグリッド表示で更新
- 更新日 2023-08-13
- サイトエディターの使用例を追加。
- 更新日 2023-08-08
- “再利用可能なブロック”を“パターン”に置き換え
- 新しいインターフェースに合わせて文言とスクリーンショットを更新。
- コマンドパレットとサイトエディターのページに関する参照を追加。
- 更新日 2023-03-27
- 6.2 向けにコンテンツとスクリーンショットを更新
- 更新日 2022-10-17
- 6.1 向けにコンテンツとスクリーンショット・動画を更新
- 更新日 2022-05-17
- 6.0 向けにコンテンツを再構成し、動画とスクリーンショットを更新
- 作成日 2022-01-05